I’ve recently had an occasion to implement reordering of a GtkListBox via drag-and-drop (DND). It was not that complicated. Since I haven’t seen drag-and-drop used much with list boxes, here is a quick summary of what is needed to get the basics working.
Setting up the drag source
There are two ways to make a GTK+ widget a drag source (i.e. a place where clicking and dragging will initiate a DND operation). You can decide dynamically to initiate a drag by calling gtk_drag_begin(). But we go for the simpler approach here: we just declare statically that our list rows should be drag sources, and let GTK+ handle all the details:
handle = gtk_event_box_new ();
gtk_container_add (GTK_CONTAINER (handle),
        gtk_image_new_from_icon_name ("open-menu-symbolic", 1));
gtk_drag_source_set (handle,
        GDK_BUTTON1_MASK, entries, 1, GDK_ACTION_MOVE);
Note that I choose to create a visible drag handle here instead of allowing drags to start anywhere on the row. It looks like this:
![]() The entries tell GTK+ what data we want to offer via drags from this source. In our case, we will not offer a standard mime type like text/plain, but instead make up our own, private type, and also hint GTK+ that we don’t want to support drags to other applications:
The entries tell GTK+ what data we want to offer via drags from this source. In our case, we will not offer a standard mime type like text/plain, but instead make up our own, private type, and also hint GTK+ that we don’t want to support drags to other applications:
static GtkTargetEntry entries[] = {
   { "GTK_LIST_BOX_ROW", GTK_TARGET_SAME_APP, 0 }
};
A little gotcha here is that the widget you set up as drag source must have a GdkWindow. A GtkButton or a GtkEventBox (as in this example) will work. GTK4 will offer a different API to create drag sources that avoids the need for a window.
With this code in place, you can already drag your rows, but so far, there’s nowhere to drop them. Lets fix that.
Accepting drops
In contrast to drags, where we created a visible drag handle to give users a hint that drag-and-drop is supported, we want to just accept drops anywhere in the list. The easiest way to do that is to just make each row a drop target (i.e. a place that will potentially accept drops).
gtk_drag_dest_set (row,
        GTK_DEST_DEFAULT_ALL, entries, 1, GDK_ACTION_MOVE);
The entries are the same that we discussed above. GTK_DEST_DEFAULT_ALL tells GTK+ to handle all aspects of the DND operation for us, so we can keep this example simple.
Now we can start a drag on the handle, and we can drop it on some other row. But nothing happens after that. We need to do a little bit of extra work to make the reordering happen. Lets do that next.
Transferring the data
Drag-and-drop is often used to transfer data between applications. GTK+ uses a data holder object called GtkSelectionData for this. To send and receive data, we need to connect to signals on both the source and the target side:
g_signal_connect (handle, "drag-data-get",
        G_CALLBACK (drag_data_get), NULL);
g_signal_connect (row, "drag-data-received",
        G_CALLBACK (drag_data_received), NULL);
On the source side, the drag-data-get signal is emitted when GTK+ needs the data to send it to the drop target. In our case, the function will just put a pointer to the source widget in the selection data:
gtk_selection_data_set (selection_data,
        gdk_atom_intern_static_string ("GTK_LIST_BOX_ROW"),
        32,
        (const guchar *)&widget,
        sizeof (gpointer));
On the target side, drag-data-received is emitted on the drop target when GTK+ passes the data it received on to the application. In our case, we will pull the pointer out of the selection data, and reorder the row.
handle = *(gpointer*)gtk_selection_data_get_data (selection_data);
source = gtk_widget_get_ancestor (handle, GTK_TYPE_LIST_BOX_ROW);

if (source == target)
  return;

source_list = gtk_widget_get_parent (source);
target_list = gtk_widget_get_parent (target);
position = gtk_list_box_row_get_index (GTK_LIST_BOX_ROW (target));

g_object_ref (source);
gtk_container_remove (GTK_CONTAINER (source_list), source);
gtk_list_box_insert (GTK_LIST_BOX (target_list), source, position);
g_object_unref (source);
The only trick here is that we need to take a reference on the widget before removing it from its parent container, to prevent it from getting finalized.
And with this, we have reorderable rows. Yay!
As a final step, lets make it look good.
A nice drag icon
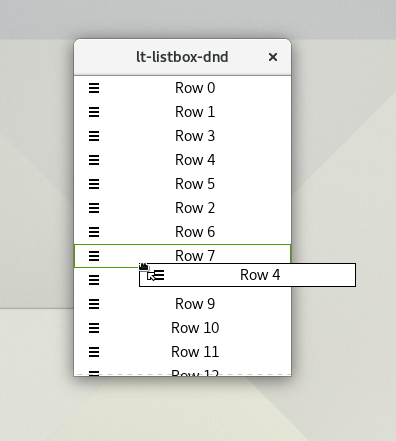
So far, during the drag, you just see just the cursor, which is not very helpful and not very pretty. The expected behavior is to drag a visual representation of the row.
To make that happen, we connect to the drag-begin signal on the drag source:
g_signal_connect (handle, "drag-begin",
        G_CALLBACK (drag_begin), NULL);
…and do some extra work to create a nice ‘drag icon’:
row = gtk_widget_get_ancestor (widget, GTK_TYPE_LIST_BOX_ROW);
gtk_widget_get_allocation (row, &alloc);
surface = cairo_image_surface_create (CAIRO_FORMAT_ARGB32,
                                      alloc.width, alloc.height);
cr = cairo_create (surface);
gtk_widget_draw (row, cr);

gtk_drag_set_icon_surface (context, surface);

cairo_destroy (cr);
cairo_surface_destroy (surface);
This looks more complicated than it is – we are creating a cairo surface of the right size, render the row widget to it (the signal is emitted on the handle, so we have to find the row as an ancestor).
![]() Unfortunately, this does not yet yield a perfect result, since list box rows generally don’t render a background or frame. To work around that, we can temporarily add a custom style class to the row’s style context, and use some custom CSS to ensure we get a background and frame:
Unfortunately, this does not yet yield a perfect result, since list box rows generally don’t render a background or frame. To work around that, we can temporarily add a custom style class to the row’s style context, and use some custom CSS to ensure we get a background and frame:
context = gtk_widget_get_style_context (row);
gtk_style_context_add_class (context, "drag-icon");
gtk_widget_draw (row, cr);
gtk_style_context_remove_class (context, "drag-icon")
As an extra refinement, we can set an offset on the surface, to prevent a visual ‘jump’ at the beginning of the drag, by placing this code before the gtk_drag_set_icon_surface() call:
gtk_widget_translate_coordinates (widget, row, 0, 0, &x, &y);
cairo_surface_set_device_offset (surface, -x, -y);
Voila!
Next steps
This article just shows the simplest possible setup for row reordering by drag-and-drop. Many refinements are possible, some easy and some not so easy.
An obvious enhancement is to allow dragging between different lists in the same application. This is just a matter of being careful about the handling of the list widgets in the drag_data_received() call, and the code I have shown here should already work for this.
Another refinement would be to drop the row before or after the target row, depending on which edge is closer. Together with this, you probably want to modify the drop target highlighing to indicate the edge where the drop will happen. This could be done in different ways, but all of them will require listening to drag-motion events and juggling event coordinates, which is not something I wanted to get into here.
Finally, scrolling the list during the drag. This is important for long lists, if you want to drag a row from the top to bottom – if the list doesn’t scroll, you have to do this in page increments, which is just too cumbersome. Implementing this may be easiest by moving the drag target to be the list widget itself, instead of the individual rows.
References
- The complete example in the GTK+ source tree: listbox-dnd.c
- GTK+ DND documentation