GtkColumnView

One thing that I left unfinished in my recent series on list views and models in GTK 4 is a detailed look at GtkColumnView. This will easily be the most complicated part of the series. We are entering into the heartland of GtkTreeView—anything aiming to replace most its features will be a complicated beast.

Overview

As we did for GtkListView, we’ll start with a high-level overview and with a picture.

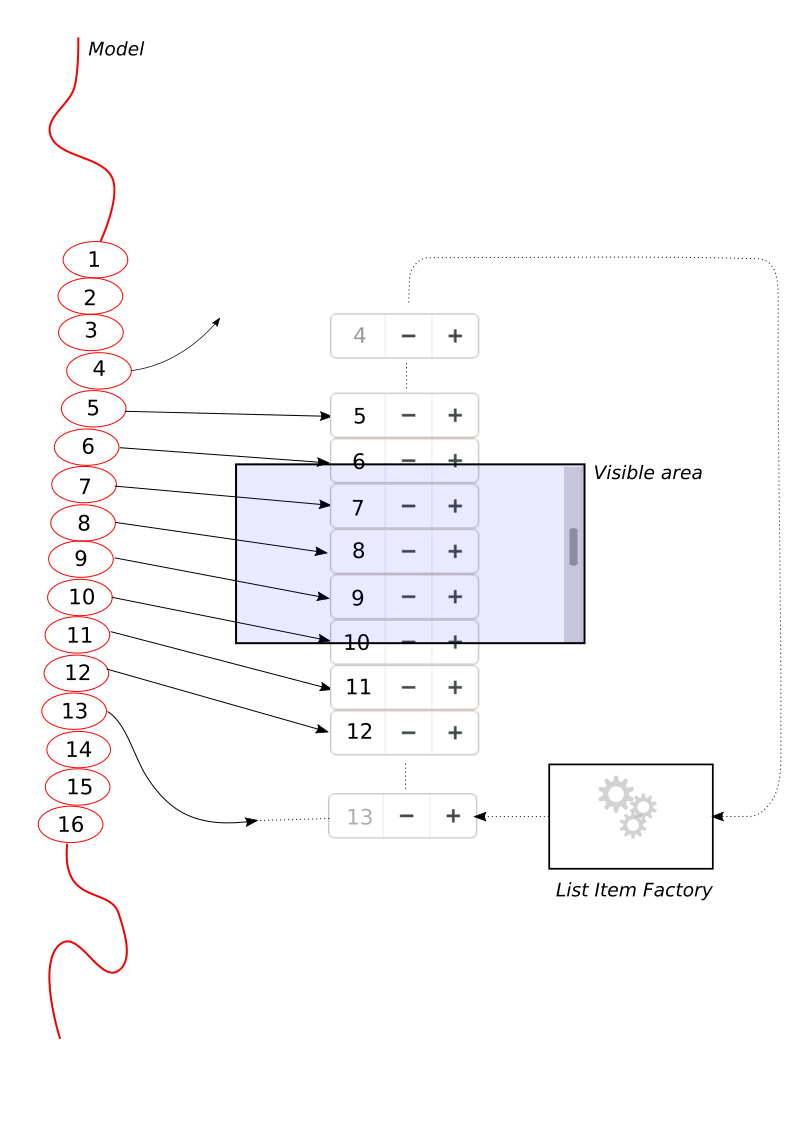
If you look back at the listview picture, you’ll remember that we use a list item factory to create a widget for each item in our model that needs to be displayed.

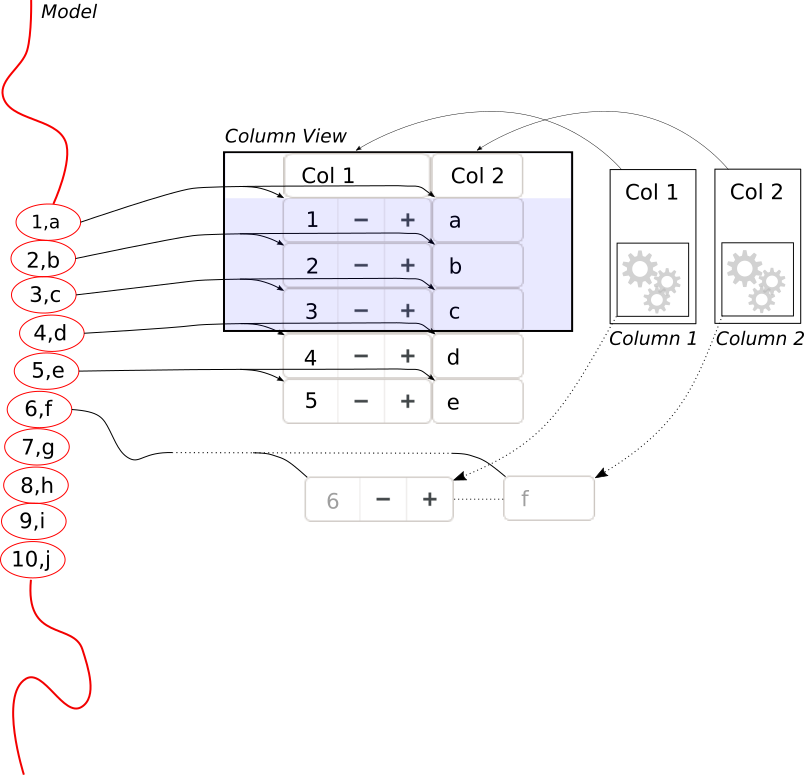
In a column view, we need multiple widgets for each item—one for each column. The way we do this is by giving each column its own list item factory. Whenever we need to display a new item, we combine the widgets from each columns factory into a row for the new item.

Internally, the column view is actually using a list view to hold the rows. This is nice in that all the things I explained in the previous post about item reuse and about how to use list item factories apply just the same.

Of course, some things are different. For example, the column view has organize the size allocation so that the widgets in all rows line up to form proper columns.

Note: Just like GtkListView, the colum view only creates widgets for the segment of the model that is currently in view, so it shares the vertical scalability. The same is not true in the horizontal direction—every row is fully populated with a widget for each column, even if they are out of view to the left or right. So if you add lots of columns, things will get slow.

Titles, and other complications

The column objects contain other data as well, such as titles. The column view is using those to display a header for each column. If the column view is marked as reorderable, you can rearrange the columns by drag-and-drop of the the header widgets. And if the columns are marked as resizable, you can drag the border between two columns to resize them.

If you payed attention, you may now wonder how this resizing goes together with the fact that the cells in the rows can be arbitrary widgets which expect to have at least their minimum size available for drawing their content. The answer is that we are using another new feature of the GTK 4 rendering machinery: Widgets can control how drawing outside their boundaries (by child widgets) is treated, with

 gtk_widget_set_overflow (cell, GTK_OVERFLOW_HIDDEN)

Sorting, selections, and the quest for treeview parity

Since we want to match GtkTreeview, feature-wise, we are not done yet. Another thing that users like to do in tree views is to click on headers, to sort the content by that column. GtkColumnView headers allow this, too.

You may remember from the last post that sorting is done by wrapping your data in a GtkSortListModel, and giving it a suitable sorter object. Since we want to have a different sort order, depending on what column header you clicked, we give each column its own sorter, which you can set with

gtk_column_view_column_set_sorter (column, sorter)

But how do we get the right sorter from the column you just clicked, and attach it to the sort model? Keep in mind that the sort model is not going to be the outmost model that we pass to the column view, since that is always a selection model, so the column view can’t just switch the sorter on the sort list model on its own.

The solution we’ve come up with is to make the column view provide a sorter that internally uses the column sorters, with

gtk_column_view_get_sorter (view)

You can give this sorter to your sort model once, when you set up your model, and then things will automagically updates when the user clicks on column headers to activate different column sorters.

This sounds complicated, but it works surprisingly well. A nice benefit of this approach is that we can actually sort by more than one column at a time—since we have all the column sorters available, and we know which one you clicked last.

Selection handling is easy, by comparison. It works just the same as it does in GtkListView.

Summary

GtkColumnView is a complex widget, but I hope this series of posts will  make it a little easier to start using it.

On list models

In the previous post, I promised to take a deeper look at list models and what GTK 4 offers in this area. Lets start be taking a look at the GListModel interface:

struct _GListModelInterface
{
  GTypeInterface g_iface;

  GType    (* get_item_type) (GListModel *list);
  guint    (* get_n_items)   (GListModel *list);
  gpointer (* get_item)      (GListModel *list,
                              guint       position);
};

An important part of implementing the interface is that you need to emit
the ::items-changed signal when required, using the helper function that
GLib has for this purpose:

void g_list_model_items_changed (GListModel *list,
                                 guint       position,
                                 guint       removed,
                                 guint       added)

A few things to note about this interface:

  • It is very minimal; which makes it easy to implement
  • The API is in terms of positions and only deals with changes in list membership—keeping track of changes to the items themselves is up to you

A list model zoo

GTK ships a sizable collection of list model implementations. Under closer inspection, they fall into several distinct groups.

List model construction kit

The first group is what could be called the list model construction kit: models that let you build new models by modifying or combining models that you already have.

The first model in this group, GtkSliceListModel, take a slice of an existing model, given by an offset and a size, and makes a new model containing just those items. This is useful if you want to present a big list in a paged view—the forward and back buttons will simply increase or decrease the offset by the size. A slice model can also be used to incrementally populate a list, by making the slice bigger over time. GTK is using this technique in some places.

The next model in this group, GtkFlattenListModel, takes several list models and combines them into one. Since this is all about list models, the models to combine are handed to the flatten model in the form of a list model of list models. This is useful whenever you need to combine data from multiple sources, as for example GTK does for the paper sizes in the print dialog.

Paper size list in print dialog
A flattened list

Note that the original models continue to exist behind the flatten model, and their updates will be propagated by the flatten list model, as expected.

Sometimes, you have your data in a list model, but it is not quite in the right form. In this case, you can use a GtkMapListModel replace every item in the original model with different one.

Concrete models

GTK and its dependencies include a number of concrete models for the types of data that we deal with ourselves.

The first example here are Pango objects that are implementing the list model interface for their data: PangoFontMap is a list model of PangoFontFamily objects, and PangoFontFamily is a list model of PangoFontFace objects. The font chooser is using these models.

font chooser dialog
A Pango list model

The next example are the GtkDirectoryList and GtkBookmarkList objects that will be used in the file chooser to represent directory contents and bookmarks. An interesting detail about these is that they both need to do IO to populate their content, and they do it asynchronously to avoid blocking the UI for extended times.

The last model in this group is a little less concrete: GtkStringList is a simple list model wrapper around the all-too-common string arrays. An example where this kind of list model will be frequently used is with GtkDropDown. This is so common that GtkDropDown has a convenience constructor that takes a string array and creates the GtkStringList for you:

GtkWidget *
    gtk_drop_down_new_from_strings (const char * const * strings)

Selection

The next group of models extends GListModel with a new interface: GtkSelectionModel. For each item in the underlying model, a GtkSelectionModel maintains the information whether it is selected or not.

We won’t discuss the interface in detail, since  it is unlikely that you need to implement it yourself, but the most important points are:

gboolean gtk_selection_model_is_selected (GtkSelectionModel *model)
                                          guint              pos)
GtkBitset *
       gtk_selection_model_get_selection (GtkSelectionModel *model)

So you can get the selection information for an individual item, or as a whole, in the form of a bitset. Of course, there is also a ::selection-changed signal that works in a very similar way to the ::items-changed signal of GListModel.

GTK has three GtkSelectionModel implementations: GtkSingleSelection, GtkMultiSelection and GtkNoSelection, which differ in the number of items that can be simultaneously selected (1, many, or 0).

The GtkGridView colors demo shows a multi-selection in action, with rubberbanding:


You are very likely to encounter selection models when working with GTK’s new list widgets, since they all expect their models to be selection models.

The big ones

The last group of models I want to mention are the ones doing the typical operations you expect in lists: filtering and sorting. The models are GtkFilterListModel and GtkSortListModel. The both use auxiliary objects to implement their operations: GtkFilter and GtkSorter. Both of these have subclasses to handle common cases: sorting and filtering strings or numbers, or using callbacks.

We have spent considerable effort on these two models in the run-up to GTK 3.99, and made them do their work incrementally, to avoid blocking the UI for extended times when working with big models.

The GtkListView words demo show interactive filtering of a list of 500.000 words:

The leftovers

There are some more list model implementations in GTK that do not fit neatly in any of the above groups, such as GtkTreeListModel, GtkSelectionFilterModel or GtkShortcutController. I’ll skip these today.

Models everywhere

I’ll finish with a brief list of GTK APIs that return list models:

  • gdk_display_get_monitors
  • gtk_widget_observe_children
  • gtk_widget_observe_controllers
  • gtk_constraint_layout_observe_constraints
  • gtk_constraint_layout_observe_guides
  • gtk_file_chooser_get_files
  • gtk_drop_down_get_model
  • gtk_list_view_get_model
  • gtk_grid_view_get_model
  • gtk_column_view_get_model
  • gtk_column_view_get_columns
  • gtk_window_get_toplevels
  • gtk_assistant_get_pages
  • gtk_stack_get_pages
  • gtk_notebook_get_pages

In summary, list models are everywhere in GTK 4. They are flexible and fun, you should use them!

A primer on GtkListView

Some of the early adopters of GTK4 have pointed out that the new list widgets are not the easiest to learn. In particular,  GtkExpression and GtkBuilderListItemFactory are hard to wrap your head around. That is not too surprising – a full list widget, with columns, and selections and sorting, and tree structure, etc is a complicated beast.

But lets see if we can unpack things one-by-one, and make it all more understandable.

Overview

Lets start with a high-level view of the relevant components and their interactions: the model, the list item factory and the list view.

They are the three things that occur when we create a list view:

view = gtk_list_view_new (model, factory);

The models we use are GListModels. These always contain GObjects, so you will have to provide your data in the form of objects. This is a first notable difference from GtkTreeview, which is using GtkTreeModels directly containing basic types.

For some simple cases, GTK provides ready-made models, such as GtkStringList. But in general, you will have to make your own model. Thankfully, GListModel is a much simpler interface than GtkTreeModel, so this is not too hard.

The responsibility of the list item factory is to produce a row widget and connect it to an item in the model, whenever the list view needs it.

The list view will create a few more rows than it needs to fill its visible area, to get a better estimate for the size of the scrollbars, and in order to have some “buffer”for when you decide to scroll the view.

Once you do scroll, we don’t necessarily need to ask the factory to make more rows —we can recycle the rows that are being scrolled out of view on the other end.

Thankfully, all of this happens automatically behind the scenes. All you have to do is provide a list item factory.

Creating items

GTK offers two different approaches for creating items. You can either do it manually, with GtkSignalListItemFactory, or you can instantiate your row widgets from a ui file, using GtkBuilderListItemFactory.

The manual approach is easier to understand, so lets look at that first.

factory = gtk_signal_list_item_factory_new ();
g_signal_connect (factory, "setup", setup_listitem_cb, NULL);
g_signal_connect (factory, "bind", bind_listitem_cb, NULL);

The “setup” signal is emitted when the factory needs to create a new row widget, “bind” is emitted when a row widget needs to be connected to an item from the model.

Both of these signals take a GtkListItem as argument, which is a wrapper object that lets you get at the model item (with gtk_list_item_get_item()) and also lets you deliver the new row widget (with gtk_list_item_set_child()).

static void
setup_listitem_cb (GtkListItemFactory *factory,
                   GtkListItem        *list_item)
{
  GtkWidget *label = gtk_label_new ("");
  gtk_list_item_set_child (list_item, label);
}

Typically, your rows will be more complicated than a single label. You can create complex widgets and group them in containers, as needed.

static void
bind_listitem_cb (GtkListItemFactory *factory,
                  GtkListItem        *list_item)
{
  GtkWidget *label;
  MyObject *obj;

  label = gtk_list_item_get_child (list_item);
  obj = gtk_list_item_get_item (list_item);
  gtk_label_set_label (GTK_LABEL (label),
                       my_object_get_string (obj));
}

If your “bind” handler connects to signals on the item or does other things that require cleanup, you can use the “unbind” signal to do that cleanup. The “setup” signal has a similar counterpart called “teardown”.

The builder way

Our “setup” handler is basically a recipe for creating a small widget hierarchy. GTK has a more declarative way of doing this: GtkBuilder ui files. That is the way GtkBuilderListItemFactory works: you give it a ui file, and it instantiates that ui file whenever it needs to create a row.

ui = "<interface><template class="GtkListItem">...";
bytes = g_bytes_new_static (ui, strlen (ui));
gtk_builder_list_item_factory_new_from_bytes (scope, bytes);

You might now be wondering: Wait a minute, you are parsing an xml file for each of the thousands of items in my model, isn’t that expensive?

There are two answers to this concern:

  • We are not literally parsing the xml for each item; we parse it once, store the callback sequence, and replay it later.
  • The  most expensive part of GtkBuilder is actually not the xml parsing, but the creation of objects; recycling rows helps for this.

It is relatively easy to see how a ui file can replace the “setup” handler, but what about “bind”? In the example above, the bind callback was getting properties of the item (the MyObject:string property) and using their values to set properties of the widgets (the GtkLabel:label property). In other words, the “bind” handler is doing property bindings. For simplicity, we just created a one-time binding here, but we could have just as well used g_object_bind_property() to create a lasting binding.

GtkBuilder ui files can set up property bindings between objects, but there is one problem: The model item is not ‘present’ in the ui file, it only gets associated with the row widget later on, at “bind” time.

This is where GtkExpression comes in. At its core, GtkExpression is a way to describe bindings between objects that don’t necessarily exist yet.  In our case, what we want to achieve is:

label->label = list_item->item->string

Unfortunately, this gets a little more clumsy when it is turned into xml as part of our ui file:

<interface>
  <template class="GtkListItem">
    <property name="child">
      <object class="GtkLabel">
        <binding name="label">
          <lookup name="string">
            <lookup name="item">GtkListItem</lookup>
          </lookup>
        </binding>
      </object>
    </property>
  </template>
</interface>

Remember that the classname (GtkListItem) in a ui template is used as the “this” pointer referring to the object that is being instantiated.

So, <lookup name=”item”>GtkListItem</lookup> means: the value of the “item” property of the list item that is created. <lookup name=”string”> means: the “string” property of that object. And <binding name=”label”> says to set the “label” property of the widget to the value of that property.

Due to the way expressions work, all of this will be reevaluated when the list item factory sets the “item” property on the list item to a new value, which is exactly what we need to make recycling of row widgets work.

Expert level confusion

GtkBuilderListItemFactory and GtkExpression can get really confusing when you nest things—list item factories can be constructed in ui files themselves, and they can get given their own UI files as a property, so you end up with constructions like

<object class="GtkListView">
  <property name="factory">
    <object class="GtkBuilderListItemFactory">
      <property name="bytes"><![CDATA[
<?xml version="1.0" encoding="UTF-8"?>
<interface>
<template class="GtkListItem">
  <property name="child">
  ...
]]>
      </property>
    </object>
  </property>
...

This can be confusing even to GTK experts.

My advice would be avoid this when starting out with GtkListView—you don’t have to create the list item factory in the UI file, and you can specify its UI template as a resource instead of embedding it directly.

Going deeper

Everything we’ve described here today applies to grid views as well, with minimal adjustments.

So far, we’ve focused on the view side of things. There’s a lot to say about models too.

And then there is the column view, which deserves a post of its own.

Custom widgets in GTK 4 – Actions

(This is the fifth part of a series about custom widgets in GTK 4. Part 1, part 2, part 3, part 4).

Activate all the things

Many things in GTK can be activated: buttons, check boxes, switches, menu items, and so on. Often, the same task can be achieved in multiple ways, for example copying the selection to the clipboard is available both via the Control-C shortcut and an item in the context menu.

Inside  GTK, there are many ways things can proceed: a signal may be emitted (::activate, or ::mnemonic-activate, or a keybinding signal), a callback may be called, or a GAction may be activated. None of this is entirely new in GTK 4, but we are moving towards using GActions as the primary mechanism for connecting actions.

Actions

Actions can appear in various forms in a GTK application.

First, there are global application actions, added to GtkApplication or GtkApplicationWindow (both of these implement the GActionGroup interface). This is where actions first appeared in GTK 3, mainly for the purpose of exporting them on the session bus for use with the app menu.

We also allow to associate actions with widgets by calling gtk_widget_insert_action_group(). Actions that are added in this way are only considered for activation when it originates in below the widget in the hierarchy.

A new way to create actions in GTK 4 is to declare actions in the class_init function, via gtk_widget_class_install_action(), similar to how properties are declared with g_object_class_install_property(). Actions created in this way are available for every instance of the widget.

Here is an example from GtkColorSwatch:

gtk_widget_class_install_action (widget_class,
                                 "color.customize", "(dddd)",
                                 customize_color);

The customize_color function is called when the color.customize action is activated. As you can see, actions can declare that they expect parameters. This is using GVariant syntax; you need to provide four double values.

A convenient shorthand allows you to create a stateful action to  set a property of your widget class:

gtk_widget_class_install_property_action (widget_class,
                                         "misc.toggle-visibility",
                                         "visibility");

This declares an action with the name misc.toggle-visibility, which toggles the value of the boolean visibility property.

Actionables and Menus

Declaring actions only goes so far, you also need to connect your actions to the UI in some form. For widgets like buttons or switches that implement the actionable interface, this is as easy as setting the action-name property:

gtk_actionable_set_action_name (GTK_ACTIONABLE (button),
                                "misc.toggle-visibility");

Of course, you can also do this in a ui file.

If you want to activate your actions from a menu, you will likely use a menu model that is constructed from XML, such as this:

<menu id="menu">
  <section>
    <item>
      <attribute name="label">Show text</attribute>
      <attribute name="action">misc.toggle-visibility</attribute>
    </item>
  </section>
</menu>

In GTK 3, you would connect to the ::populate-popup signal to add items to the context menus of labels or entries. In GTK 4, this is done by adding a menu model to the widget:

gtk_entry_set_extra_menu (entry, menu_model);

Going deeper

To learn more about actions in GTK 4, you can read the action overview in the GTK documentation.

Custom widgets in GTK 4 – Input

(This is the fourth part of a series about custom widgets in GTK 4. Part 1, part 2, part 3).

Event handlers take over

In the previous parts, we’ve seen a few examples where handling GtkWidget signals was replaced by some auxiliary objects. This trend is even stronger in the input area, where we’ve traditionally had a number of signals to handle: ::button-press-event, ::key-press-event,  ::touch-event, and so on. All of these signals are gone in GTK 4, and instead you are expected to add event controllers to your widget, and listen to their signals. For example, there are GtkGestureClick, GtkEventControllerKey, GtkGestureLongPress, and many more.

Event controllers can be created in ui files, but it is more common to do that in the init() function:

static void click_cb (GtkGestureClick *gesture,
                      int              n_press,
                      double           x,
                      double           y)
{
  GtkEventController *controller = GTK_EVENT_CONTROLLER (gesture);
  GtkWidget *widget = gtk_event_controller_get_widget (controller);

  if (x < gtk_widget_get_width (widget) / 2.0 &&
      y < gtk_widget_get_height (widget) / 2.0)
     g_print ("Red!\n");
}

...

  controller = gtk_gesture_click_new ();
  g_signal_handler_connect (controller, "pressed",
                            G_CALLBACK (click_cb), NULL);
  gtk_widget_add_controller (widget, controller);

gtk_widget_add_controller() takes ownership of the controller and GTK cleans controllers up automatically when the widget is finalized, so there is nothing more to do.

Complex event handlers

The examples of event handlers in the previous sections are simple and handle only individual events, one at a time. Gestures are a bit more involved, since they handle sequences of related events, and generally keep state.

Examples of much more complex event handlers include things like DND, and keyboard shortcuts.   We may cover some of these in a later article.

Going deeper

The unifying  principle behind all the different event handlers is that GTK propagates the events it receives from the windowing system from the root of the widget tree to a target widget, and back up again, in a pattern commonly referred to as capture-bubble.

In the case of keyboard events, the target widget is the current focus. For pointer events, it is the hovered widget under the pointer.

To read more about input handling in GTK, visit the input handling overview in the GTK documentation.

Outlook

We’ve reached the end of the prepared material for this series. It may continue at some point in the future, if there is interest. Possible topics include: shortcuts, actions and activation, drag-and-drop, focus handling, or accessibility.

Custom widgets in GTK 4 – Layout

(This is the third part of a series about custom widgets in GTK 4. Part 1, part 2).

Widgets are recommended

As we said earlier, “everything is a widget.” For example, we recommend that you use a GtkLabel instead of manually rendering a pango layout, or a GtkImage instead of manually loading and rendering a pixbuf.  Using a ready-made widget ensures that you get all of the expected behaviors, such as selection handling, context menus or hi-dpi support. And it is much easier than doing it all yourself.

Delegating Layout

The default implementations of the snapshot() and measure() functions are handling child widgets automatically. The main responsibility for a custom widget is to arrange the child widgets as required. In GTK 3, this would have been done by implementing the size_allocate() function. You can still do that. But in  GTK 4, a more convenient alternative is to use a layout manager. GTK comes with a number of predefined layout managers, such as GtkBoxLayout, GtkCenterLayout, GtkGridLayout, to name just a few.

A layout manager can be set up in various ways, the easiest is to set a layout manager type in your class_init function:

gtk_widget_class_set_layout_manager_type (widget_class, 
                                          GTK_TYPE_GRID_LAYOUT);

GTK will then automatically instantiate and use a layout manager of this type.

Layout managers wrap your child widgets in their own “layout child” objects, which can have properties that affect the layout. This is a replacement for child properties. And just like child properties, you can set these  “layout properties” in ui files:

<child>
  <object class="GtkLabel">
    <property name="label">Image:</property>
    <layout>
      <property name="left-attach">0</property>
    </layout>
  </object>
</child>

Adding children

Using templates is the most convenient way to add children to a widget. In GTK 4 that works for any widget, not just for containers. If for some reason, you need to create your child widgets manually, this is best done in your init() function:

void
demo_init (DemoWidget *demo)
{
  demo->label = gtk_label_new ("Image:");
  gtk_widget_set_parent (demo->label, GTK_WIDGET (demo));
}

When doing that, it is important to set up the correct parent-child relationships to make your child widgets part of the overall widget heirarchy. And this setup needs to be undone  in your dispose() function:

void
demo_dispose (GObject *object)
{
  DemoWidget *demo = DEMO_WIDGET (object);

  g_clear_pointer (&demo->label, gtk_widget_unparent);

  GTK_WIDGET_CLASS (demo_widget_parent_class)->dispose (object);
}

New possibilities

Layout managers nicely isolate the layout tasks from the rest of the widget machinery, which makes it easier to experiment with new layouts.

For example, GTK 4 includes GtkConstraintLayout, which uses a constraint solver to create layouts according to a set of constraints on widget sizes and positions.

To learn more about constraints in GTK 4, read the documentation for GtkConstraintLayout.

Outlook

In the next post, we’ll look how widgets in GTK 4 handle input.

Custom widgets in GTK 4 – Drawing

(This is the second part of a series about custom widgets in GTK 4. Part 1).

Drawing the old-fashioned way

Before looking at how widgets do their own drawing, it is worth pointing out that GtkDrawingArea is still a valid option if all you need is some self-contained cairo drawing.

The only difference between GTK 3 and GTK 4 is that you call gtk_drawing_area_set_draw_func() to provide your drawing function instead of connecting a signal handler to the the ::draw signal. Everything else is the same: GTK provides you with a cairo context, and you can just draw to it.

void
draw_func (GtkDrawingArea *da,
           cairo_t        *cr,
           int             width,
           int             height,
           gpointer        data)
{
  GdkRGBA red, green, yellow, blue;
  double w, h;

  w = width / 2.0;
  h = height / 2.0;

  gdk_rgba_parse (&red, "red");
  gdk_rgba_parse (&green, "green");
  gdk_rgba_parse (&yellow, "yellow");
  gdk_rgba_parse (&blue, "blue");

  gdk_cairo_set_source_rgba (cr, &red);
  cairo_rectangle (cr, 0, 0, w, h);
  cairo_fill (cr);

  gdk_cairo_set_source_rgba (cr, &green);
  cairo_rectangle (cr, w, 0, w, h);
  cairo_fill (cr);

  gdk_cairo_set_source_rgba (cr, &yellow);
  cairo_rectangle (cr, 0, h, w, h);
  cairo_fill (cr);

  gdk_cairo_set_source_rgba (cr, &blue);
  cairo_rectangle (cr, w, h, w, h);
  cairo_fill (cr);
}

...

gtk_drawing_area_set_draw_func (area, draw, NULL, NULL);

The rendering model

One of the major differences between GTK 3 and GTK 4 is that we are now targeting GL / Vulkan instead of cairo. As part of this switch, we have moved from an immediate mode rendering model to a retained mode one. In GTK 3, we were using cairo commands to render onto a surface. In GTK 4, we create a scene graph that contains render nodes, and those render nodes can be passed to renderer, or processed in some other way, or saved to a file.

In the widget API, this change is reflected in the difference between

gboolean (* draw) (GtkWidget *widget, cairo_t *cr)

and

 void (* snapshot) (GtkWidget *widget, GtkSnapshot *snapshot)

GtkSnapshot is an auxiliary object that turns your drawing commands into render nodes and adds them to the scene graph.

The CSS style information for a widget describes how to render its background, border, and so on. GTK translates this a series of function calls that add suitable render nodes to the scene graph, before and after the render nodes for the widgets’ content. So your widget automatically complies with the CSS drawing model, without any extra work.

Providing the render nodes for the content is the reponsibility of the widgets snapshot() implementation. GtkSnapshot has convenience API to make it easy.  For example, use gtk_snapshot_append_texture() to render a texture. Use gtk_snapshot_append_layout() to render text. If you want to use custom cairo drawing, gtk_snapshot_append_cairo() lets you do so.

A drawing widget

To implement a  widget that does some custom drawing, you need to implement the snapshot() function that creates the render nodes for your drawing:

void
demo_snapshot (GtkWidget *widget, GtkSnapshot *snapshot)
{
  GdkRGBA red, green, yellow, blue;
  float w, h;

  gdk_rgba_parse (&red, "red");
  gdk_rgba_parse (&green, "green");
  gdk_rgba_parse (&yellow, "yellow");
  gdk_rgba_parse (&blue, "blue");

  w = gtk_widget_get_width (widget) / 2.0;
  h = gtk_widget_get_height (widget) / 2.0;

  gtk_snapshot_append_color (snapshot, &red,
                             &GRAPHENE_RECT_INIT(0, 0, w, h));
  gtk_snapshot_append_color (snapshot, &green,
                             &GRAPHENE_RECT_INIT(w, 0, w, h));
  gtk_snapshot_append_color (snapshot, &yellow,
                             &GRAPHENE_RECT_INIT(0, h, w, h));
  gtk_snapshot_append_color (snapshot, &blue,
                             &GRAPHENE_RECT_INIT(w, h, w, h));
}

...

widget_class->snapshot = demo_snapshot;

This example produces four color nodes:

If your drawing needs a certain size, you should implement the measure() function too:

void
demo_measure (GtkWidget      *widget,
              GtkOrientation  orientation,
              int             for_size,
              int            *minimum_size,
              int            *natural_size,
              int            *minimum_baseline,
              int            *natural_baseline)
{
  *minimum_size = 100;
  *natural_size = 200;
}

...

widget_class->measure = demo_measure;

GTK keeps the render nodes produced by your snapshot() function and reuses them until you tell it that your widget needs to be drawn again by calling gdk_widget_queue_draw().

Going deeper

The GTK documentation has an overview of the GTK drawing model, if you are interested in reading more about this topic.

Outlook

In the next post, we’ll look how widgets in GTK 4 handle child widgets.

Custom widgets in GTK 4 – Introduction

With GTK 4 getting closer to completion, now is a good time to provide an overview of how custom widgets will look in GTK 4.

This series of posts will look at the major aspects of writing a widget, and how they changed compared to GTK 3. The articles will provide a high-level overview; for a detailed checklist for porting an application to GTK 4, look at the  migration guide.

Introduction

The general direction of our API changes has been to emphasize delegation over subclassing. One of the motivations for this is to make writing your own widgets easier and less error-prone. As a consequence, you will see a lot more auxiliary objects that take over aspects of functionality from core widget classes. And many widgets are now final classes – deriving directly from GtkWidget is expected.

Another general trend in our API is that “everything is a widget.” In GTK 3, we slowly broke up complex widgets into their constituent parts, first with CSS nodes and then with gadgets. In GTK 4, for example the trough and the slider of a GtkScale are fully formed sub-widgets which can maintain their own state and receive input like any other widget.

A big loser in the GTK 4 transition is the GtkContainer base class. It has become much less important. Any widget can have child widgets now. Child properties have been replaced by layout children and their properties. And all focus handling has been moved from GtkContainer to GtkWidget.

Another big loser is GtkWindow. In GTK 3, all the “popups”  (entry completion, menus, tooltips, etc) were using a GtkWindow underneath. In GTK 4, most of them have been converted to popovers, and the GtkPopover implementation has been untangled from GtkWindow. In addition, many pieces of toplevel-specific functionality have been broken out in separate interfaces called GtkRoot and GtkNative.

Outlook

In the next post, we’ll look how widgets in GTK 4 do their own drawing with render nodes.

Data transfer in GTK4

The traditional methods for user-initiated data transfers between desktop apps are the clipboard or Drag-and-Drop. GTK+ has supported these methods since the beginning of time, but up until GTK3, the APIs we had for this kind of data transfer were thinly disguised copies of the corresponding X11 apis: selections, and properties and atoms. This is not too surprising, since the entire GDK api was modeled on X11. Unfortunately, the implementation includes horrors such as incremental transfers and string format conversions.

For GTK4, we’re leaving these things behind as we are moving things in GDK around to be closer to the Wayland API. Data transfer is one the areas in most urgent need of this modernization. Thankfully, it is almost complete at this point, so it is worth taking a look at what has changed, and how things will work in the future.

Concepts

If the data your application wants to send is not a string, it is probably some object, such as GFile, a GdkTexture, or a GdkRGBA. The app on the receiving side may be not use GTK or GLib, and thus won’t know these types. And even if it does, there’s no way to get the objects from one process to the other in one piece.

At the core, the data transfer works be sending a file descriptor from the source app, and the target app reading a stream of bytes from it. The protocols for clipboard and DND use mime types such as text/uri-list, image/png or application/x-color to identify the format of the byte stream.

Sending an object involves negotiating a data format that both sides support, serializing the object on the source side into a byte stream of that format, transferring the data, and deserializing the object on the target side.

The local case

Before moving on to concrete APIs, it is worth pausing a moment to consider another common case of data transfer: inside a single application. It is quite common to use the same clipboard and DND mechanisms to send data from the one side of the application to the other. Since we are not crossing process boundaries in this case, we can avoid the byte stream and the associated serialization and deserialization overhead, and transfer the data by just passing a reference to the object.

APIs

The objects we’ve alluded to in the previous section are described by GTypes such as G_TYPE_FILE or GDK_TYPE_TEXTURE, while, as mentioned, the data exchange formats in Wayland and X11 protocols are described by mime types.

The first API we have introduced to deal with these types is the GdkContentFormats object. It can contain a list of formats, which may be GTypes or mime types. We use GdkContentFormats objects to describe the formats that an application can offer data in, as well as the formats that an application can receive data it.

You may wonder why we are mixing GTypes and mime types in the same object. The answer is that we want to handle both the cross-process and the local case with the same APIs. And while we need to match mime types for the cross-process case, we need the GTypes for the local case.

Conversion

We still need a way to associate GTypes and mime types that we can convert into each other. This is handled by the GdkContentSerializer and GdkContentDeserializer APIs. These are essentially registries of conversion functions: GdkContentSerializer knows how to convert GTypes into mime types, and GdkContentDeserializer handles the other direction.

GDK has predefined conversions for common types, but the system is extensible using gdk_content_register_serializer and gdk_content_register_deserializer.

Content

Now we know how to describe formats and convert between them, but to  put this all together, we still need a convenient api that takes an object on the one side, and provides a bytes stream on the other.  For this, we added the GdkContentProvider API.

A GdkContentProvider lets you combine an object with a format description on the input side, and provides an async writer API on the output side that can be connected to the file descriptor that we want to send the data over.

Typical content providers are created like this:

gdk_content_provider_new_for_value (gvalue)
gdk_content_provider_new_for_bytes (gbytes, mimetype)

The GValue that it takes contains both an object and information about its type, so we don’t need extra type information, if we provide the object as  a GBytes (essentially a just a bit of memory), we need to provide the type information separately.

The Clipboard

GTK3 has a GtkClipboard object, which provides the implemention for copy/paste operations. Having this object in GTK is not ideal, since it needs different implementations on the platforms that are supported by GTK. Therefore, GTK4 moves the object to GDK, and consequently renames it to GdkClipboard. It has also been ported to the new data transfer apis that are described above. To put data on the clipboard in GTK4, you use one of the ‘set’ apis:

gdk_clipboard_set_content()
gdk_clipboard_set_value()
gdk_clipboard_set_text()

Ultimately, all of these functions end up associating a GdkContentProvider with the clipboard.

To read data from the clipboard in GTK4, you use one of the async ‘read’ apis:

gdk_clipboard_read_async()
gdk_clipboard_read_value_async()
gdk_clipboard_read_text_async()

Drag-and-Drop

The GTK3 Drag-and-Drop api involves listening to a number of signals on GtkWidget, and calling a few special setup functions for drag sources and destinations. It is flexible, but generally considered confusing, and we won’t describe it in detail here.

In GTK4,  the Drag-and-Drop api has been reorganized around the concepts of content providers and event controllers. To initiate a Drag-and-Drop operation, you create a GtkDragSource event controller that reacts to drag gestures (you can also start ‘one-off’ Drag-and-Drop operations by just calling gdk_drag_begin yourself), and you give it a GdkContentProvider for the data that you want to transfer. To receive Drag-and-Drop operations, you create a GtkDropTarget event controller and call an async read method when it emits the ::drop-done signal:

gdk_drop_read_value_async()
gdk_drop_read_text_async()

Constraint layouts

What are constraints

At its most basic, a constraint is a relation between two values. The relation
can be described as a linear equation:

target.attribute = source.attribute × multiplier + constant

For instance, this:

Can be described as:

blue.start = red.end × 1.0 + 8.0

Or:

  • the attribute, “start”, of the target, “blue”, which is going to be set by the constraint; this is the left hand side of the equation
  • the relation between the left and right hand sides of the equation, in this case equality; relations can also be greater than or equal to,
    and less than or equal to
  • the attribute, “end”, of the source, “red”, which is going to be read by the constraint; this is the right hand side of the equation
  • the multiplier, “1.0”, applied to the attribute of the source
  • the constant, “8.0”, an offset added to the attribute

A constraint layout is a series of equations like the one above, describing all the relationships between the various parts of your UI.

It’s important to note that the relation is not an assignment, but an equality (or an inequality): both sides of the equation will be solved in a way that satisfies the constraint; this means that the list of constraints can be rearranged; for instance, the example above can be rewritten as:

red.end = blue.start × 1.0 - 8.0

In general, for the sake of convenience and readability, you should arrange your constraints in reading order, from leading to trailing edge, from top to bottom. You should also favour whole numbers for multipliers, and positive numbers for constants.

Solving the layout

Systems of linear equations can have one solution, multiple solutions, or even no solution at all. Additionally, for performance reasons, you don’t really want to recompute all the solutions every time.

Back in 1998, the Cassowary algorithm for solving linear arithmetic constraints was published by Greg J. Badros and Alan Borning, alongside its implementation in C++, Smalltalk, and Java. The Cassowary algorithm tries to solve a system of linear equations by finding its optimal solution; additionally, it does so incrementally, which makes it very useful for user interfaces.

Over the past decade various platforms and toolkits started providing layout managers based on constraints, and most of them used the Cassowary algorithm. The first one was Apple’s AutoLayout, in 2011; in 2016, Google added a ConstraintLayout to the Android SDK.

In 2016, Endless implemented a constraint layout for GTK 3 in a library called Emeus. Starting from that work, GTK 4 now has a GtkConstraintLayout layout manager available for application and widget developers.

The machinery that implements the constraint solver is private to GTK, but the public API provides a layout manager that you can assign to your GtkWidget class, and an immutable GtkConstraint object that describes each constraint you wish to add to the layout, binding two widgets together.

Guiding the constraints

Constraints use widgets as sources and targets, but there are cases when you want to bind a widget attribute to a rectangular region that does not really draw anything on screen. You could add a dummy widget to the layout, and then set its opacity to 0 to avoid it being rendered, but that would add unnecessary overhead to the scene. Instead, GTK provides GtkConstraintGuide, and object whose only job is to contribute to the layout:

An example of the guide UI element

In the example above, only the widgets marked as “Child 1” and “Child 2” are going to be visible, while the guide is going to be an empty space.

Guides have a minimum, natural (or preferred), and maximum size. All of them are constraints, which means you can use guides not just as helpers for alignment, but also as flexible spaces in a layout that can grow and shrink.

Describing constraints in a layout

Constraints can be added programmatically, but like many things in GTK, they can also be described inside GtkBuilder UI files, for convenience. If you add a GtkConstraintLayout to your UI file, you can list the constraints and guides inside the special “<constraints>” element:

  <object class="GtkConstraintLayout">
    <constraints>
      <constraint target="button1" target-attribute="width"
                     relation="eq"
                     source="button2" source-attribute="width" />
      <constraint target="button2" target-attribute="start"
                     relation="eq"
                     source="button1" source-attribute="end"
                     constant="12" />
      <constraint target="button1" target-attribute="start"
                     relation="eq"
                     source="super" source-attribute="start"
                     constant="12" />
      <constraint target="button2" target-attribute="end"
                     relation="eq"
                     source="super" source-attribute="end"
                     constant="-12"/>
    </constraints>
  </object>

You can also describe a guide, using the “<guide>” custom element:

  <constraints>
    <guide min-width="100" max-width="500" />
  </constraints>

Visual Format Language

Aside from XML, constraints can also be described using a compact syntax called “Visual Format Language”. VFL descriptions are row and column oriented: you describe each row and column in the layout using a line that visually resembles the layout you’re implementing, for instance:

|-[findButton]-[findEntry(<=250)]-[findNext][findPrev]-|

Describes an horizontal layout where the findButton widget is separated from the leading edge of the layout manager by some default space, and followed by the same default amount of space; then by the findEntry widget, which is meant to be at most 250 pixels wide. After the findEntry widget we have some default space again, followed by two widgets, findNext and findPrev, flush one against the other; finally, these two widgets are separated from the trailing edge of the layout manager by the default amount of space.

Using the VFL notation, GtkConstraintLayout will create all the required constraints without necessarily having to describe them all manually.

It’s important to note that VFL cannot describe all possible constraints; in some cases you will need to create them using GtkConstraint’s API.

Limits of a constraint layout

Constraint layouts are immensely flexible because they can implement any layout policy. This flexibility comes at a cost:

  • your layout may have too many solutions, which makes it ambiguous and unstable; this can be problematic, especially if your layout is very complex
  • your layout may not have any solution. This is usually the case when you’re not using enough constraints; a rule of thumb is to use at least two constraints per target per dimension, since all widgets should have a defined position and size
  • the same layout can be described by different series of constraints; in some cases it’s virtually impossible to say which approach is better, which means you will have to experiment, especially when it comes to layouts that dynamically add or remove UI elements, or that allow user interactions like dragging UI elements around

Additionally, at larger scales, a local, ad hoc layout manager may very well be more performant than a constraint based one; if you have a list box that can grow to an unknown amount of rows you should not replace it with a constraint layout unless you measure the performance impact upfront.

Demos

Of course, since we added this new API, we also added a few demos to the GTK Demo application:

A constraints demo
The constraints demo window, as part of the GTK demo application.

As well as a full constraints editor demo:

The GTK constraints editor demo
A screenshot of the GTK constraints editor demo application, showing the list of UI elements, guides, and constraints in a side bar on the left, and the result on the right side of the window

More information