Layout managers in GTK 4

Containers and layout policies have been a staple of GTK’s design since the very beginning. If you wanted your widget to lay out its children according to a specific policy, you had to implement GtkContainer for handling the addition, removal, and iteration of the child widgets, and then you had to implement the size negotiation virtual functions from GtkWidget to measure, position, and size each child.

One of the major themes of the GTK 4 development cycle is to delegate more functionality to ancillary objects instead of encoding it into the base classes provided by GTK. For instance, we moved the event handling from signal handlers described by GtkWidget into event controllers, and rendering is delegated to GtkSnapshot objects. Another step in that direction is decoupling the layout mechanism from GtkWidget itself to an ancillary type, GtkLayoutManager.

Layout Managers

A layout manager is the object responsible for measuring and sizing a widget and its children. Each GtkWidget owns a GtkLayoutManager, and uses it in place of the measure() and allocate() virtual functions—which are going away. The gist of the change: instead of subclassing a GtkWidget to implement its layout policy, you subclass GtkLayoutManager, and then assign the layout manager to a widget.

Just like in the old GtkWidget code, you will need to override a virtual function to measure the layout, called measure(), which replaces the get_preferred_* family of virtual functions of GTK 3:

static void
layout_measure (GtkLayoutManager *layout_manager,
                GtkWidget        *widget,
                GtkOrientation    orientation,
                int               for_size,
                int              *minimum,
                int              *natural,
                int              *minimum_baseline,
                int              *natural_baseline)

After measuring, you need to assign the size to the layout; this happens in the allocate() virtual function, which replaces the venerable size_allocate() virtual function of previous GTK major versions:

static void
layout_allocate (GtkLayoutManager *layout_manager,
                 GtkWidget        *widget,
                 int               width,
                 int               height,
                 int               baseline)

On the more esoteric side, you can also override the get_request_mode() virtual function, which allows you to declare whether the layout manager requests a constant size, or if one of its sizes depend on the opposite one, like height-for-width or width-for-height:

static GtkSizeRequestMode
layout_get_request_mode (GtkLayoutManager *layout_manager,
                         GtkWidget        *widget)

As you may notice, each virtual function gets passed the layout manager instance, as well as the widget that is using the layout manager.

Of course, this has bigger implications on various aspects of how GTK widgets work, the most obvious being that all the complexity for the layout code can now stay confined into its own object, typically not derivable, whereas the widgets can stay derivable and become simpler.

Another feature of this work is that you can change layout managers at run time, if you want to change the layout policy of a container; you can also have a per-widget layout policy, without adding more complexity to the widget code.

Finally, layout managers allow us to get rid of one of the special cases of GTK, namely: container child properties.

Child properties

Deep in the guts of GtkContainer sits what’s essentially a copy of the GObject property-related code, and whose only job is to implement “child” properties for types deriving from GtkContainer. These container/child properties exist only as long as a child is parented to a specific class of container, and are used for a variety of reasons—but, generally, to control layout options, like the packing direction in boxes and box-like containers; the fixed positioning inside GtkFixed; or the expand/fill rules for notebook tab widgets.

Child properties are hard to use, as they require ad hoc API instead of the usual GObject one, and thus require special casing in GtkBuilder, gtk-doc, and language bindings. Child properties are also attached to the actual direct child of the container, so if a widget interposes a child—like, say, GtkScrolledWindow or GtkListBox do—then you need to keep a reference to that child around in order to change the layout that applies to your own widget.

In GTK’s master branch we got rid of most of them—either by simply removing them when there’s actual widget API that implements the same functionality, or by creating ancillary GObject types and moving child properties to those types. The end goal is to remove all of them, and the relative API from GtkContainer, by the time GTK 4 rolls out. For layout-related properties, GtkLayoutManager provides its own API so that objects are created and destroyed automatically once a child is added to, or removed from, a widget using a layout manager, respectively. The object created is introspectable, and does not require special casing when it comes to documentation or bindings.

You start from deriving your own type from the GtkLayoutChild class, and adding properties just like you would for any other GObject type. Then, you override GtkLayoutManager‘s create_layout_child() virtual function:

static GtkLayoutChild *
create_layout_child (GtkLayoutManager *manager,
                     GtkWidget *container,
                     GtkWidget *child)
{
  // The simplest implementation
  return g_object_new (your_layout_child_get_type (),
                       "layout-manager", manager,
                       "child-widget", child,
                       "some-property", some_property_initial_state,
                       NULL);
}

After that, you can access your layout child object as long as a widget is still a child of the container using the layout manager; if the child is removed from its parent, or the container changes the layout manager, the layout child is automatically collected.

New layout managers

Of course, just having the GtkLayoutManager class in GTK would not do us any good. GTK 4 introduces various layout managers for application and widget developers:
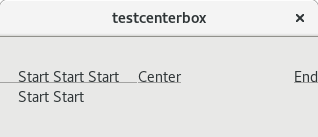
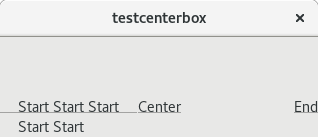
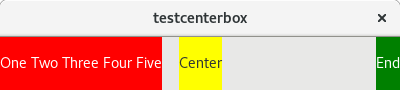
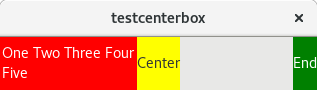
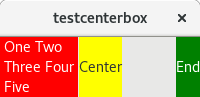
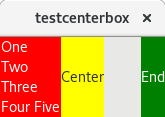
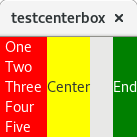
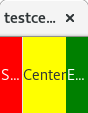
  • GtkBinLayout implements the layout policy of GtkBin, with the added twist that it supports multiple children stacked on top of each other, similarly to how GtkOverlay works. You can use each widget’s alignment and expansion properties to control their location within the allocated area, and the GtkBinLayout will always ask for as much space as it’s needed to allocate its largest child.
  • GtkBoxLayout is a straight port of the layout policy implemented by GtkBox; GtkBox itself has been ported to use GtkBoxLayout internally.
  • GtkFixedLayout is a port of the fixed layout positioning policy of GtkFixed and GtkLayout, with the added functionality of letting you define a generic transformation, instead of a pure 2D translation for each child; GtkFixed has been modified to use GtkFixedLayout and use a 2D translation—and GtkLayout has been merged into GtkFixed, as its only distinguishing feature was the implementation of the GtkScrollable interface.
  • GtkCustomLayout is a convenience layout manager that takes functions that used to be GtkWidget virtual function overrides, and it’s mostly meant to be a bridge while porting existing widgets towards the layout manager future.

We are still in the process of implementing GtkGridLayout and make GtkGrid use it internally, following the same pattern as GtkBoxLayout and GtkBox. Other widgets inside GTK will get their own layout managers along the way, but in the meantime they can use GtkCustomLayout.

The final step is to implement a constraint-based layout manager, which would let us create complex, responsive user interfaces without resorting to packing widgets into nested hierarchies. Constraint-based layouts deserve their own blog post, so stay tuned!

Entries in GTK 4

One of the larger refactorings that recently landed in GTK master is re-doing the entry hierarchy. This post is summarizing what has changed, and why we think things are better this way.

Entries in GTK 3

Lets start by looking at how things are in GTK 3.

GtkEntry is the basic class here. It implements the GtkEditable interface. GtkSpinButton is a subclass of GtkEntry. Over the years, more things were added. GtkEntry gained support for entry completion, and for embedding icons, and for displaying progress. And we added another subclass, GtkSearchEntry.

Some problems with this approach are immediately apparent. gtkentry.c is more than 11100 lines of code. It it not only very hard to add more features to this big codebase, it is also hard to subclass it – and that is the only way to create your own entries, since all the single-line text editing functionality is inside GtkEntry.

The GtkEditable interface is really old – it has been around since before GTK 2. Unfortunately, it has not really been successful as an interface – GtkEntry is the only  implementation, and it uses the interface functions internally in a confusing way.

Entries in GTK 4

Now lets look at how things are looking in GTK master.

The first thing we’ve done is to move the core text editing functionality of GtkEntry into a new widget called GtkText. This is basically an entry minus all the extras, like icons, completion and progress.

We’ve made the GtkEditable interface more useful, by adding some more common functionality (like width-chars and max-width-chars) to it, and made GtkText implement it. We also added helper APIs to make it easy to delegate a GtkEditable implementation to another object.

The ‘complex’ entry widgets (GtkEntry, GtkSpinButton, GtkSearchEntry) are now all composite widgets, which contain a GtkText child, and delegate their GtkEditable implementation to this child.

Finally, we added a new GtkPasswordEntry widget, which takes over the corresponding functionality that GtkEntry used to have, such as showing a Caps Lock warning

or letting the user peek at the content.

Why is this better?

One of the main goals of this refactoring was to make it easier to create custom entry widgets outside GTK.

In the past, this required subclassing GtkEntry, and navigating a complex maze of vfuncs to override. Now, you can just add a GtkText widget, delegate your GtkEditable implementation to it, and have a functional entry widget with very little effort.

And you have a lot of flexibility in adding fancy things around the GtkText component. As an example, we’ve added a tagged entry to gtk4-demo that can now be implemented easily outside GTK itself.

Will this affect you when porting from GTK 3?

There are a few possible gotcha’s to keep in mind while porting code to this new style of doing entries.

GtkSearchEntry and GtkSpinButton are no longer derived from GtkEntry. If you see runtime warnings about casting from one of these classes to GtkEntry, you most likely need to switch to using GtkEditable APIs.

GtkEntry and other complex entry widgets are no longer focusable – the focus goes to the contained GtkText instead. But gtk_widget_grab_focus() will still work, and move the focus the right place. It is unlikely that you are affected by this.

The Caps Lock warning functionality has been removed from GtkEntry. If you were using a GtkEntry with visibility==FALSE for passwords, you should just switch to GtkPasswordEntry.

If you are using a GtkEntry for basic editing functionality and don’t need any of the extra entry functionality, you should consider using a GtkText instead.

textures and paintables

With GTK4, we’ve been trying to find better solution for image data. In GTK3 the objects we used for this were pixbufs and Cairo surfaces. But they don’t fit the bill anymore, so now we have GdkTexture and GdkPaintable.

GdkTexture

GdkTexture is the replacement for GdkPixbuf. Why is it better?
For a start, it is a lot simpler. The API looks like this:

int gdk_texture_get_width (GdkTexture *texture);
int gdk_texture_get_height (GdkTexture *texture);

void gdk_texture_download (GdkTexture *texture,
                           guchar     *data,
                           gsize       stride);

So it is a 2D pixel array and if you want to, you can download the pixels. It is also guaranteed immutable, so the pixels will never change. Lots of constructors exist to create textures from files, resources, data or pixbufs.

But the biggest difference between textures and pixbufs is that they don’t expose the memory that they use to store the pixels. In fact, before gdk_texture_download() is called, that data doesn’t even need to exist.
And this is used in the GL texture. The GtkGLArea widget for example uses this method to pass data around. GStreamer is expected to pass video in the form of GL textures, too.

GdkPaintable

But sometimes, you have something more complex than an immutable bunch of pixels. For example you could have an animated GIF or a scalable SVG. That’s where GdkPaintable comes in.
In abstract terms, GdkPaintable is an interface for objects that know how to render themselves at any size. Inspired by CSS images, they can optionally provide intrinsic sizing information that GTK widgets can use to place them.
So the core of the GdkPaintable interface are the function make the paintable render itself and the 3 functions that provide sizing information:

void gdk_paintable_snapshot (GdkPaintable *paintable,
                             GdkSnapshot  *snapshot,
                             double        width,
                             double        height);

int gdk_paintable_get_intrinsic_width (GdkPaintable *paintable);
int gdk_paintable_get_intrinsic_height (GdkPaintable *paintable);
double gdk_paintable_get_intrinsic_aspect_ratio (GdkPaintable *paintable);

On top of that, the paintable can emit the “invalidate-contents” and “invalidate-size” signals when its contents or size changes.

To make this more concrete, let’s take a scalable SVG as an example: The paintable implementation would return no intrinsic size (the return value 0 for those sizing function achieves that) and whenever it is drawn, it would draw itself pixel-exact at the given size.
Or take the example of the animated GIF: It would provide its pixel size as its intrinsic size and draw the current frame of the animation scaled to the given size. And whenever the next frame of the animation should be displayed, it would emit the “invalidate-size” signal.
And last but not least, GdkTexture implements this interface.

We’re currently in the process of changing all the code that in GTK3 accepted GdkPixbuf to now accept GdkPaintable. The GtkImage widget of course has been changed already, as have the drag’n’drop icons or GtkAboutDialog. Experimental patches exist to let applications provide paintables to the GTK CSS engine.

And if you now put all this information together about GStreamer potentially providing textures backed by GL images and creating paintables that do animations that can then be uploaded to CSS, you can maybe see where this is going

Input methods in GTK+ 4

GTK’s support for loadable modules dates back to the beginning of time, which is why GTK has a lot of code to deal with GTypeModules and with search paths, etc. Much later on, Alex revisited this topic for GVfs, and came up with the concept of extension points and GIO modules, which implement them.  This is a much nicer framework, and GTK 4 is the perfect opportunity for us to switch to using it.

Changes in GTK+ 4

Therefore, I’ve recently spent some time on the module support in GTK. The major changes here are the following:

  • We no longer support general-purpose loadable modules. One of the few remaining users of this facility is libcanberra, and we will look at implementing ‘event sound’ functionality directly in GTK+ instead of relying on a module for it. If you rely on loading GTK+ modules, please come and talk to us about other ways to achieve what you are doing.
  • Print backends are now defined using an extension point named “gtk-print-backend”, which requires the type GtkPrintBackend.  The existing print backends have been converted to GIO modules implementing this extension point. Since we have never supported out-of-tree print backends, this should not affect anybody else.
  • Input methods are also defined using an extension point, named “gtk-im-module”, which requires the GtkIMContext type.  We have dropped all the non-platform IM modules, and moved the platform IM modules into GTK+ proper, while also implementing the extension point.

Adapting existing input methods

Since we still support out-of-tree IM modules, I want to use the rest of this post to give a quick sketch of how an out-of-tree IM module for GTK+ 4 has to look.

There are a few steps to convert a traditional GTypeModule-based IM module to the new extension point. The example code below is taken from the Broadway input method.

Use G_DEFINE_DYNAMIC_TYPE

We are going to load a type from a module, and G_DEFINE_DYNAMIC_TYPE is the proper way to define such types:

G_DEFINE_DYNAMIC_TYPE (GtkIMContextBroadway,
                       gtk_im_context_broadway,
                       GTK_TYPE_IM_CONTEXT)

Note that this macro defines a gtk_im_context_broadway_register_type() function, which we will use in the next step.

Note that dynamic types are expected to have a class_finalize function in addition to the more common class_init, which can be trivial:

static void
gtk_im_context_broadway_class_finalize
               (GtkIMContextBroadwayClass *class)
{
}

Implement the GIO module API

In order to be usable as a GIOModule, a module must implement three functions: g_io_module_load(), g_io_module_unload() and g_io_module_query() (strictly speaking, the last one is optional, but we’ll implement it here anyway).

void
g_io_module_load (GIOModule *module)
{
  g_type_module_use (G_TYPE_MODULE (module));
  gtk_im_context_broadway_register_type  
                        (G_TYPE_MODULE (module));
  g_io_extension_point_implement
             (GTK_IM_MODULE_EXTENSION_POINT_NAME,
              GTK_TYPE_IM_CONTEXT_BROADWAY,
              "broadway",
              10);
 }
void
g_io_module_unload (GIOModule *module)
{
}
char **
g_io_module_query (void)
{
  char *eps[] = {
    GTK_IM_MODULE_EXTENSION_POINT_NAME,
    NULL
  };
  return g_strdupv (eps);
}

Install your module properly

GTK+ will still look in $LIBDIR/gtk-4.0/immodules/ for input methods to load, but GIO only looks at shared objects whose name starts with “lib”, so make sure you follow that convention.

Debugging

And thats it!

Now GTK+ 4 should load your input method, and if you run a GTK+ 4 application with GTK_DEBUG=modules, you should see your module show up in the debug output.


A scrolling primer

A few years ago, I wrote a post about scrolling in GTK+ 3. Time for another look!

The common case

The basic idea of the changes described back then is still the same. We expect touchpad (or track point) scrolling to be one of the most common forms of scrolling, and the scrollbar operates as a narrow indicator for this.

As you can see, we change the cursor to indicate scrolling, and it you can freely scroll in all directions. It is kinetic, too.

Classical scrolling

Of course, it is still possible to just click and drag the slider, for classical scrolling.

Another aspect of ‘classical’ scrolling is that you can click on the trough outside the slider, and either warp the position to where you clicked, or jump in page-size increments.

By default, a primary click warps, and Shift-primary click goes by pages. We just added back middle click as an alternative to Shift-primary click, since this is a common alternative that many people are used to. For mainly historical reasons, GTK+ has a setting, gtk-primary-button-warps-slider, which switches the roles of primary click and Shift-primary click for this.

The typical keyboard shortcuts (Page Up, Page Down, Home, End) let you control scrolling with the keyboard.

Smooth scrolling

There’s more to scrolling in GTK+ that you may not know about. One feature that we introduced long ago is a ‘zoom’ or ‘fine adjustment’ mode, which slows the scrolling down to allow pixel-precise positioning.

To trigger this mode you can either use a long press or shift-click in the slider. As you can see in the video, once you move the pointer below or above the scrollbar, it will keep scrolling at the same relaxed speed until you let go.

As a variation on this theme, more recently we added a variable speed variant of smooth scrolling.

To trigger it, you secondary click in the trough outside the slider. Once the scrolling starts, you can control the speed by moving the pointer closer or farther away from the scrollbar. This is pretty addictive, once you’ve discovered it!

Custom locations

As the last feature, applications can add a context menu that gets triggered by secondary click on the slider, and make it scroll to important positions.

Thats it, scroll on!

Container secrets: size allocation, part 6

Baselines

We are entering another of the more mysterious areas of GTK+ size allocation. Baselines move widgets from a simple box-with-width-and-height model to one where widgets can be aligned vertically in more interesting ways. The main place where this is matters is text. The readers eye is very sensitive to words moving up and down as you move along a line of text. Baselines are there to avoid that.


Since this is about aligning children vertically wrt. to each other, baselines are only relevant when the container is in horizontal orientation.

Measure above and below

Since children can now have a ‘forced’ alignment, simply t aking the maximum of the children’s heights is no longer sufficient. The alignment might cause children to ‘stick out’ at the top or the bottom, requiring a greater overall height. In order to handle this, we measure the parts ‘above the baseline’ and the parts ‘below the baseline’ separately, and maximize them separately.

for (i = 0; i < 3; i++) {
  gtk_widget_measure (child[i],
                      orientation,
                      sizes[i].minimum_size,
                      &child_min, &child_nat,
                      &child_min_baseline, &child_nat_baseline);

   below_min = MAX (below_min, child_min - child_min_baseline);
   above_min = MAX (above_min, child_min_baseline);
   below_nat = MAX (below_nat, child_nat - child_nat_baseline);
   above_nat = MAX (above_nat, child_nat_baseline);
}

total_min = above_min + below_min;
total_nat = above_nat + below_nat;

This code leaves out some details, such as dealing with children that don’t return a baseline.

Allocate on baseline

On the allocation side, there are two cases: either we are given a baseline that we have to align our children to, or we have to determine a baseline ourselves. In the latter case, we need to do essentially the same we already did for measuring: determine the below and above sizes separately, and use them to find our baseline:

for (i = 0; i < 3; i++) {
  if (gtk_widget_get_valign (child[i]) != GTK_ALIGN_BASELINE)
    continue;

  gtk_widget_measure (child[i],
                      GTK_ORIENTATION_VERTICAL,
                      child_size[i],
                      &child_min, &child_nat,
                      &child_min_baseline, &child_nat_baseline);

  below_min = MAX (below_min, child_min - child_min_baseline);
  below_nat = MAX (below_nat, child_nat - child_nat_baseline);
  above_min = MAX (above_min, child_min_baseline);
  above_nat = MAX (above_nat, child_nat_baseline);
}

When it comes to determining the baseline, we again have a choice to make. When there is more space available than the minimum, do we place the baseline as high as possible, or as low as possible, or somewhere in the middle? GtkBox has a ::baseline-position property to leave this choice to the user, and we do the same here.

switch (baseline_position) {
  case GTK_BASELINE_POSITION_TOP:
    baseline = above_min;
    break;
  case GTK_BASELINE_POSITION_CENTER:
    baseline = above_min + (height - (above_min + below_min)) / 2;
    break;
  case GTK_BASELINE_POSITION_BOTTOM:
    baseline = height - below_min;
    break;
}
Expanded, baseline position: center
Compressed, baseline position: top
Compressed, baseline position: center
Compressed, baseline position: bottom

Summary

This ends our journey through GTK+’s size allocation machinery. I hope you enjoyed it.

References

  1. Container secrets: size allocation
  2. Container secrets: size allocation, part 2
  3. Container secrets: size allocation, part 3
  4. Container secrets: size allocation, part 4
  5. Container secrets: size allocation, part 5
  6. The code with these changes

Container secrets: size allocation, part 5

Orientation

Many widgets in GTK+ can be oriented either horizontally or vertically. Anything from a separator to a toolbar is implementing the GtkOrientable interface to allow this to be changed at runtime, by setting the ::orientation property. So, obviously, GtkCenterBox should follow this pattern too.

I’m not explaining in detail how to add the interface and implement the property. The interesting part for us is how we are going to use the orientation property during size allocation.

Thankfully, much of our machinery is already written in terms of a single dimension, and can be applied to a height just as well as a width. What remains to be done is going through all the functions, and making sure that we take the orientation into account whenever we do something that depends on it. For example, we introduce a little helper to query the proper expand property.

static gboolean
get_expand (GtkWidget *widget,
            GtkOrientation orientation)
{
  if (orientation == GTK_ORIENTATION_HORIZONTAL)
    return gtk_widget_get_hexpand (widget);
  else
    return gtk_widget_get_vexpand (widget);
}

One thing to keep in mind is that some of the features we implement here only apply in horizontal orientation, such as right-to-left flipping, or baselines.

The measure() function changes to avoid hardcoding horizontal orientation:

if (orientation == self->orientation)
  gtk_center_box_measure_orientation (widget, orientation, for_size,
                                      minimum, natural,
                                      min_baseline, nat_baseline);
else
  gtk_center_box_measure_opposite (widget, orientation, for_size,
                                   minimum, natural,
                                   min_baseline, nat_baseline);

The size_allocate() function calls distribute() to distribute either the width or the height, depending on orientation:

if (self->orientation == GTK_ORIENTATION_HORIZONTAL) {
  size = width;
  for_size = height;
} else {
  size = height;
  for_size = width;
}
distribute (self, for_size, size, sizes);

After these straightforward, but tedious changes, we can orient a center box vertically:

References

  1. Container secrets: size allocation
  2. Container secrets: size allocation, part 2
  3. Container secrets: size allocation, part 3
  4. Container secrets: size allocation, part 4
  5. The code with these changes

Container secrets: size allocation, part 4

Height-for-width

This is where we enter the deeper parts of GTK+ size allocation. Height-for-width means that a widget does not have a single minimum size, but it might be able to accommodate a smaller width in return for getting a bigger height. Most widgets are not like this. The typical example for this behavior is a label that can wrap its text in multiple lines:


Height-for-width makes size allocation more expensive, so containers have to enable it explicitly, by setting a request mode. In general, containers should look at their children and use the request mode that is preferred by the majority of them. For simplicity, we just hardcode height-for-width here:

static GtkSizeRequestMode
gtk_center_box_get_request_mode (GtkWidget *widget)
{
  return GTK_SIZE_REQUEST_HEIGHT_FOR_WIDTH;
}

Measure both ways

The idiomatic way to write a measure() function that can handle height-for-width is to break it down into two cases: one where we are measuring along the orientation of the layout, and one where we are measuring in the opposite direction.

if (orientation == GTK_ORIENTATION_HORIZONTAL)
  measure_orientation (widget, for_size,
                       orientation,
                       minimum, natural,
                       minimum_baseline, natural_baseline);
else
  measure_opposite (widget, for_size,
                    orientation,
                    minimum, natural,
                    minimum_baseline, natural_baseline);

Measuring in the direction of the orientation is just like what our measure() function has done all along: we get a height, so we ask all children how much width they need for that height, and we sum up the answers.

Measuring in the opposite direction means to answer the question: given this width, how much height do you need ? We want to ask the children the same question, but what width should we give to each child ? We can’t just pass the full width to each child, since we don’t want them to overlap.

Distribute

To solve this, we need to distribute the available width among the children. This is just what our size_allocate() function is doing, so we need to break out the guts of size_allocate() out into a separate function.

Unsurprisingly, we will call the new function distribute().

static void
distribute (GtkCenterBox *self,
            int for_size,
            int size,
            GtkRequestedSize *sizes)
{
   /* Do whatever size_allocate() used to do
    * to determine sizes
    */

  sizes[0].minimum_size = start_size;
  sizes[1].minimum_size = center_size;
  sizes[2].minimum_size = end_size;
}

Now that we know how to get candidate widths for the children, we can complete the function to measure in the opposite direction. As before, we eventually return the maximum of the required heights for our children, since our layout is horizontal.

Note that orientation is GTK_ORIENTATION_VERTICAL in this case, so the min and nat values returned by the gtk_widget_measure() calls are heights.

distribute (self, -1, width, sizes);

gtk_widget_measure (start_widget,
                    orientation,
                    sizes[0].minimum_size,
                    &start_min, &start_nat,
                    &min_baseline, &nat_baseline);

gtk_widget_measure (center_widget,
                    orientation,
                    sizes[1].minimum_size,
                    &center_min, &center_nat,
                    &min_baseline, &nat_baseline);

gtk_widget_measure (end_widget,
                    orientation,
                    sizes[2].minimum_size,
                    &end_min, &end_nat,
                    &min_baseline, &nat_baseline);

*minimum = MAX (start_min, center_min, end_min);
*natural = MAX (start_nat, center_nat, end_nat);

Since we have now broken out the bulk of size_allocate() into the distribute() function, we can just call it from there and then do the remaining work that is necessary to assign positions to the children (since distribute already gave us the sizes).

Expanded
Slightly below natural size
Smaller
and smaller
and smaller

References

  1. Container secrets: size allocation
  2. Container secrets: size allocation, part 2
  3. Container secrets: size allocation, part 3
  4. The code with these changes
  5. Documentation of height-for-width geometry management

Container secrets: size allocation, part 3

 Expanding children

The next stop in our quest for featureful size allocation is the ::expand property. There are actually two of them,  ::hexpand and ::vexpand, and they have a somewhat interesting behavior of propagating upwards in the widget hierarchy. But that is not what we are going to discuss today, we simply want to give the children of our center box widget all the available space if they have the ::hexpand flag set.

Once again, the measure() implementation can stay as it is. And once again, we need to make a decision about who to expand first, if more than one child has an expand flag set. GtkBox tries to treat all its children the same, and evenly distributes the available extra space among all expanding children. We, on the other hand, prefer the center child, since it is the most important one.

But how do we go about this ? After some experimentation, I figured that if we already have to push the center child to the left or right because it does not fit, there is not point in making it even larger. Therefore we only respect the expand flag if that is not the case:

center_expand = gtk_widget_get_hexpand (center);

if (left_size > center_x)
  center_x = left_size;
else if (width - right_size < center_pos + center_size)
  center_x = width - center_width - right_size;
else if (center_expand) {
  center_width = width - 2 * MAX (left_size, right_size);
  center_x = (width / 2) - (center_width / 2);
}

After doing this, there may still be some space left that we can give to the outer children, if they are expanding:

if (left_expand)
  left_size = center_pos - left_pos;
if (right_expand)
  right_size = pos + width - (center_pos + center_width);
No expanding children
Center child expanding
End child expanding
Center and end children expanding

References

  1. Container secrets: size allocation
  2. Container secrets: size allocation, part 2
  3. The code with these changes

Container secrets: size allocation, part 2

Right-to-left languages

As the first thing in this series, we add back support for right-to-left languages.

It may be a little surprising if you are only used to writing software in English, but GTK+ has traditionally tried to ‘do the right thing’ automatically for languages that are written from right to left like Hebrew. Concretely, that means that we interpret the starting position in horizontal layouts to be on the right in these languages, i.e. we ‘flip’ horizontal arrangements. This can of course be overridden, by setting the ::text-direction property of the container. By default, the text direction gets determined from the locale.

This is of course very easy to do. The code I showed in the first post assumes left-to-right order of the children. We keep it that way and just reorder the children when necessary. Note that the measure() code doesn’t need any change, since it does not depend on the order at all. So, we just change size_allocate():

if (text_direction == rtl) {
  child[0] = last;
  child[1] = center;
  child[2] = first;
} else {
  child[0] = first;
  child[1] = center;
  child[2] = last;
}

One small gotcha that I haven’t mentioned yet: CSS assumes that :first-child is always the leftmost element, regardless of text direction. So, when we are moving child widgets from the left side to the right side in RTL context, we need to reorder the corresponding CSS nodes when the text direction changes.

if (direction == GTK_TEXT_DIR_LTR) {
  first = gtk_widget_get_css_node (start_widget);
  last = gtk_widget_get_css_node (end_widget);
} else {
  first = gtk_widget_get_css_node (end_widget);
  last = gtk_widget_get_css_node (start_widget);
}

parent = gtk_widget_get_css_node (box);
gtk_css_node_insert_after (parent, first, NULL);
gtk_css_node_insert_before (parent, last, NULL);

Natural size

Since this was easy, we’ll press on and make our size allocation respect natural size too.

In GTK+ every widget has not just a minimum size, which is the smallest size that it can usefully present itself in, but also a preferred or natural size. The measure() function returns both of these sizes.

For natural size, we can do slightly better than the code we showed last time. Back then, we simply calculated the natural size of the box by adding up the natural sizes of all children. But we want to center the middle child, so lets ask for enough room to give all children their natural size and put the middle child in the center:

*natural = child2_nat + 2 * MAX (child1_nat, child3_nat);

The size_allocate() function needs more work, and here we have some decisions to make. With 3 children vying for the available space, and the extra constraint imposed by centering, we could prefer to give more space to the outer children, or make the center child bigger. Since centering is the defining feature of this widget, I went with the latter choice.

So, how much space can we give to the center widget ? We don’t want to make it smaller than the minimum size, or bigger than the natural size, and we need to leave at least the minimum required space for the outer children.

center_size = CLAMP (width - (left_min + right_min),
                     center_min, center_nat);

Next, lets figure out how much space we can give to the outer children. We obviously can’t hand out more than we have left after giving the center child its part, and we have to split the remaining space evenly in order for centering to work (which is what avail in the code below is about). Again, want to respect the childs minimum and natural size.

avail = MIN ( (width - center_size) / 2,
              width - (center_size + right_min));
left_size = CLAMP (avail, left_min, left_nat);

And similarly for the right child. After determining the child sizes, all that is left is to assign the positions in the same way we’ve seen in part one: put the outer children at the very left and right, then center the middle child and push it to the right or left to avoid overlap.

Expanded
Natural size
Below natural size
Smaller
Minimum size

References

  1. Container secrets, size allocation
  2. The code with these changes