Custom widgets in GTK 4 – Actions

(This is the fifth part of a series about custom widgets in GTK 4. Part 1, part 2, part 3, part 4).

Activate all the things

Many things in GTK can be activated: buttons, check boxes, switches, menu items, and so on. Often, the same task can be achieved in multiple ways, for example copying the selection to the clipboard is available both via the Control-C shortcut and an item in the context menu.

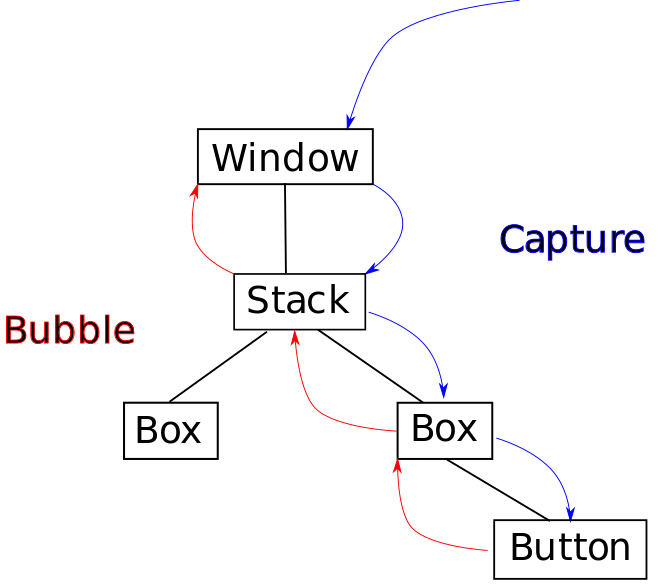
Inside  GTK, there are many ways things can proceed: a signal may be emitted (::activate, or ::mnemonic-activate, or a keybinding signal), a callback may be called, or a GAction may be activated. None of this is entirely new in GTK 4, but we are moving towards using GActions as the primary mechanism for connecting actions.

Actions

Actions can appear in various forms in a GTK application.

First, there are global application actions, added to GtkApplication or GtkApplicationWindow (both of these implement the GActionGroup interface). This is where actions first appeared in GTK 3, mainly for the purpose of exporting them on the session bus for use with the app menu.

We also allow to associate actions with widgets by calling gtk_widget_insert_action_group(). Actions that are added in this way are only considered for activation when it originates in below the widget in the hierarchy.

A new way to create actions in GTK 4 is to declare actions in the class_init function, via gtk_widget_class_install_action(), similar to how properties are declared with g_object_class_install_property(). Actions created in this way are available for every instance of the widget.

Here is an example from GtkColorSwatch:

gtk_widget_class_install_action (widget_class,
                                 "color.customize", "(dddd)",
                                 customize_color);

The customize_color function is called when the color.customize action is activated. As you can see, actions can declare that they expect parameters. This is using GVariant syntax; you need to provide four double values.

A convenient shorthand allows you to create a stateful action to  set a property of your widget class:

gtk_widget_class_install_property_action (widget_class,
                                         "misc.toggle-visibility",
                                         "visibility");

This declares an action with the name misc.toggle-visibility, which toggles the value of the boolean visibility property.

Actionables and Menus

Declaring actions only goes so far, you also need to connect your actions to the UI in some form. For widgets like buttons or switches that implement the actionable interface, this is as easy as setting the action-name property:

gtk_actionable_set_action_name (GTK_ACTIONABLE (button),
                                "misc.toggle-visibility");

Of course, you can also do this in a ui file.

If you want to activate your actions from a menu, you will likely use a menu model that is constructed from XML, such as this:

<menu id="menu">
  <section>
    <item>
      <attribute name="label">Show text</attribute>
      <attribute name="action">misc.toggle-visibility</attribute>
    </item>
  </section>
</menu>

In GTK 3, you would connect to the ::populate-popup signal to add items to the context menus of labels or entries. In GTK 4, this is done by adding a menu model to the widget:

gtk_entry_set_extra_menu (entry, menu_model);

Going deeper

To learn more about actions in GTK 4, you can read the action overview in the GTK documentation.

Custom widgets in GTK 4 – Input

(This is the fourth part of a series about custom widgets in GTK 4. Part 1, part 2, part 3).

Event handlers take over

In the previous parts, we’ve seen a few examples where handling GtkWidget signals was replaced by some auxiliary objects. This trend is even stronger in the input area, where we’ve traditionally had a number of signals to handle: ::button-press-event, ::key-press-event,  ::touch-event, and so on. All of these signals are gone in GTK 4, and instead you are expected to add event controllers to your widget, and listen to their signals. For example, there are GtkGestureClick, GtkEventControllerKey, GtkGestureLongPress, and many more.

Event controllers can be created in ui files, but it is more common to do that in the init() function:

static void click_cb (GtkGestureClick *gesture,
                      int              n_press,
                      double           x,
                      double           y)
{
  GtkEventController *controller = GTK_EVENT_CONTROLLER (gesture);
  GtkWidget *widget = gtk_event_controller_get_widget (controller);

  if (x < gtk_widget_get_width (widget) / 2.0 &&
      y < gtk_widget_get_height (widget) / 2.0)
     g_print ("Red!\n");
}

...

  controller = gtk_gesture_click_new ();
  g_signal_handler_connect (controller, "pressed",
                            G_CALLBACK (click_cb), NULL);
  gtk_widget_add_controller (widget, controller);

gtk_widget_add_controller() takes ownership of the controller and GTK cleans controllers up automatically when the widget is finalized, so there is nothing more to do.

Complex event handlers

The examples of event handlers in the previous sections are simple and handle only individual events, one at a time. Gestures are a bit more involved, since they handle sequences of related events, and generally keep state.

Examples of much more complex event handlers include things like DND, and keyboard shortcuts.   We may cover some of these in a later article.

Going deeper

The unifying  principle behind all the different event handlers is that GTK propagates the events it receives from the windowing system from the root of the widget tree to a target widget, and back up again, in a pattern commonly referred to as capture-bubble.

In the case of keyboard events, the target widget is the current focus. For pointer events, it is the hovered widget under the pointer.

To read more about input handling in GTK, visit the input handling overview in the GTK documentation.

Outlook

We’ve reached the end of the prepared material for this series. It may continue at some point in the future, if there is interest. Possible topics include: shortcuts, actions and activation, drag-and-drop, focus handling, or accessibility.

Custom widgets in GTK 4 – Layout

(This is the third part of a series about custom widgets in GTK 4. Part 1, part 2).

Widgets are recommended

As we said earlier, “everything is a widget.” For example, we recommend that you use a GtkLabel instead of manually rendering a pango layout, or a GtkImage instead of manually loading and rendering a pixbuf.  Using a ready-made widget ensures that you get all of the expected behaviors, such as selection handling, context menus or hi-dpi support. And it is much easier than doing it all yourself.

Delegating Layout

The default implementations of the snapshot() and measure() functions are handling child widgets automatically. The main responsibility for a custom widget is to arrange the child widgets as required. In GTK 3, this would have been done by implementing the size_allocate() function. You can still do that. But in  GTK 4, a more convenient alternative is to use a layout manager. GTK comes with a number of predefined layout managers, such as GtkBoxLayout, GtkCenterLayout, GtkGridLayout, to name just a few.

A layout manager can be set up in various ways, the easiest is to set a layout manager type in your class_init function:

gtk_widget_class_set_layout_manager_type (widget_class, 
                                          GTK_TYPE_GRID_LAYOUT);

GTK will then automatically instantiate and use a layout manager of this type.

Layout managers wrap your child widgets in their own “layout child” objects, which can have properties that affect the layout. This is a replacement for child properties. And just like child properties, you can set these  “layout properties” in ui files:

<child>
  <object class="GtkLabel">
    <property name="label">Image:</property>
    <layout>
      <property name="left-attach">0</property>
    </layout>
  </object>
</child>

Adding children

Using templates is the most convenient way to add children to a widget. In GTK 4 that works for any widget, not just for containers. If for some reason, you need to create your child widgets manually, this is best done in your init() function:

void
demo_init (DemoWidget *demo)
{
  demo->label = gtk_label_new ("Image:");
  gtk_widget_set_parent (demo->label, GTK_WIDGET (demo));
}

When doing that, it is important to set up the correct parent-child relationships to make your child widgets part of the overall widget heirarchy. And this setup needs to be undone  in your dispose() function:

void
demo_dispose (GObject *object)
{
  DemoWidget *demo = DEMO_WIDGET (object);

  g_clear_pointer (&demo->label, gtk_widget_unparent);

  GTK_WIDGET_CLASS (demo_widget_parent_class)->dispose (object);
}

New possibilities

Layout managers nicely isolate the layout tasks from the rest of the widget machinery, which makes it easier to experiment with new layouts.

For example, GTK 4 includes GtkConstraintLayout, which uses a constraint solver to create layouts according to a set of constraints on widget sizes and positions.

To learn more about constraints in GTK 4, read the documentation for GtkConstraintLayout.

Outlook

In the next post, we’ll look how widgets in GTK 4 handle input.

Custom widgets in GTK 4 – Drawing

(This is the second part of a series about custom widgets in GTK 4. Part 1).

Drawing the old-fashioned way

Before looking at how widgets do their own drawing, it is worth pointing out that GtkDrawingArea is still a valid option if all you need is some self-contained cairo drawing.

The only difference between GTK 3 and GTK 4 is that you call gtk_drawing_area_set_draw_func() to provide your drawing function instead of connecting a signal handler to the the ::draw signal. Everything else is the same: GTK provides you with a cairo context, and you can just draw to it.

void
draw_func (GtkDrawingArea *da,
           cairo_t        *cr,
           int             width,
           int             height,
           gpointer        data)
{
  GdkRGBA red, green, yellow, blue;
  double w, h;

  w = width / 2.0;
  h = height / 2.0;

  gdk_rgba_parse (&red, "red");
  gdk_rgba_parse (&green, "green");
  gdk_rgba_parse (&yellow, "yellow");
  gdk_rgba_parse (&blue, "blue");

  gdk_cairo_set_source_rgba (cr, &red);
  cairo_rectangle (cr, 0, 0, w, h);
  cairo_fill (cr);

  gdk_cairo_set_source_rgba (cr, &green);
  cairo_rectangle (cr, w, 0, w, h);
  cairo_fill (cr);

  gdk_cairo_set_source_rgba (cr, &yellow);
  cairo_rectangle (cr, 0, h, w, h);
  cairo_fill (cr);

  gdk_cairo_set_source_rgba (cr, &blue);
  cairo_rectangle (cr, w, h, w, h);
  cairo_fill (cr);
}

...

gtk_drawing_area_set_draw_func (area, draw, NULL, NULL);

The rendering model

One of the major differences between GTK 3 and GTK 4 is that we are now targeting GL / Vulkan instead of cairo. As part of this switch, we have moved from an immediate mode rendering model to a retained mode one. In GTK 3, we were using cairo commands to render onto a surface. In GTK 4, we create a scene graph that contains render nodes, and those render nodes can be passed to renderer, or processed in some other way, or saved to a file.

In the widget API, this change is reflected in the difference between

gboolean (* draw) (GtkWidget *widget, cairo_t *cr)

and

 void (* snapshot) (GtkWidget *widget, GtkSnapshot *snapshot)

GtkSnapshot is an auxiliary object that turns your drawing commands into render nodes and adds them to the scene graph.

The CSS style information for a widget describes how to render its background, border, and so on. GTK translates this a series of function calls that add suitable render nodes to the scene graph, before and after the render nodes for the widgets’ content. So your widget automatically complies with the CSS drawing model, without any extra work.

Providing the render nodes for the content is the reponsibility of the widgets snapshot() implementation. GtkSnapshot has convenience API to make it easy.  For example, use gtk_snapshot_append_texture() to render a texture. Use gtk_snapshot_append_layout() to render text. If you want to use custom cairo drawing, gtk_snapshot_append_cairo() lets you do so.

A drawing widget

To implement a  widget that does some custom drawing, you need to implement the snapshot() function that creates the render nodes for your drawing:

void
demo_snapshot (GtkWidget *widget, GtkSnapshot *snapshot)
{
  GdkRGBA red, green, yellow, blue;
  float w, h;

  gdk_rgba_parse (&red, "red");
  gdk_rgba_parse (&green, "green");
  gdk_rgba_parse (&yellow, "yellow");
  gdk_rgba_parse (&blue, "blue");

  w = gtk_widget_get_width (widget) / 2.0;
  h = gtk_widget_get_height (widget) / 2.0;

  gtk_snapshot_append_color (snapshot, &red,
                             &GRAPHENE_RECT_INIT(0, 0, w, h));
  gtk_snapshot_append_color (snapshot, &green,
                             &GRAPHENE_RECT_INIT(w, 0, w, h));
  gtk_snapshot_append_color (snapshot, &yellow,
                             &GRAPHENE_RECT_INIT(0, h, w, h));
  gtk_snapshot_append_color (snapshot, &blue,
                             &GRAPHENE_RECT_INIT(w, h, w, h));
}

...

widget_class->snapshot = demo_snapshot;

This example produces four color nodes:

If your drawing needs a certain size, you should implement the measure() function too:

void
demo_measure (GtkWidget      *widget,
              GtkOrientation  orientation,
              int             for_size,
              int            *minimum_size,
              int            *natural_size,
              int            *minimum_baseline,
              int            *natural_baseline)
{
  *minimum_size = 100;
  *natural_size = 200;
}

...

widget_class->measure = demo_measure;

GTK keeps the render nodes produced by your snapshot() function and reuses them until you tell it that your widget needs to be drawn again by calling gdk_widget_queue_draw().

Going deeper

The GTK documentation has an overview of the GTK drawing model, if you are interested in reading more about this topic.

Outlook

In the next post, we’ll look how widgets in GTK 4 handle child widgets.

Custom widgets in GTK 4 – Introduction

With GTK 4 getting closer to completion, now is a good time to provide an overview of how custom widgets will look in GTK 4.

This series of posts will look at the major aspects of writing a widget, and how they changed compared to GTK 3. The articles will provide a high-level overview; for a detailed checklist for porting an application to GTK 4, look at the  migration guide.

Introduction

The general direction of our API changes has been to emphasize delegation over subclassing. One of the motivations for this is to make writing your own widgets easier and less error-prone. As a consequence, you will see a lot more auxiliary objects that take over aspects of functionality from core widget classes. And many widgets are now final classes – deriving directly from GtkWidget is expected.

Another general trend in our API is that “everything is a widget.” In GTK 3, we slowly broke up complex widgets into their constituent parts, first with CSS nodes and then with gadgets. In GTK 4, for example the trough and the slider of a GtkScale are fully formed sub-widgets which can maintain their own state and receive input like any other widget.

A big loser in the GTK 4 transition is the GtkContainer base class. It has become much less important. Any widget can have child widgets now. Child properties have been replaced by layout children and their properties. And all focus handling has been moved from GtkContainer to GtkWidget.

Another big loser is GtkWindow. In GTK 3, all the “popups”  (entry completion, menus, tooltips, etc) were using a GtkWindow underneath. In GTK 4, most of them have been converted to popovers, and the GtkPopover implementation has been untangled from GtkWindow. In addition, many pieces of toplevel-specific functionality have been broken out in separate interfaces called GtkRoot and GtkNative.

Outlook

In the next post, we’ll look how widgets in GTK 4 do their own drawing with render nodes.

Controlling content sizes in GtkScrolledWindow

The GtkScrolledWindow widget is an old friend of Gtk+ application developers; its purpose is to allow big widgets to fit into small spaces through the use of scroll bars.

GtkScrolledWindow Example
A vertical GtkScrolledWindow in action

Since Gtk+ 3.0, GtkScrolledWindow has the ability to set the minimum content sizes (both width and height) through the GtkScrolledWindow:min-content-width and GtkScrolledWindow:min-content-height properties, and their related functions.

Starting from the next stable release, Gtk+ will also provide the maximum size counterparts of those properties.

What Do They Do?

The minimum sizes properties, as the name implies, define the minimum size, be it width or height, that the scrollable area will have – even if its child does not completely fill the available space.

scrolledwindow min-content-height
The scrolled window is allocated even when child widgets don’t fill the available space.

The maximum content sizes, on the other hand, define how much the scrollable area is allowed to grow before its contents will starts scrolling.

Lets see it in action:

scroll animation
Example demonstrating minimum and maximum content sizes. The scrolled window is never smaller than 110px, and never taller than 250px.
Where & How to Use Them

You want to use the new properties whenever you want to limit the size of the scrollable area. For example, GtkPopover always shrinks its children widgets to their minimum sizes. The following section exemplifies how to make the content grow to at most 300px, both width and height wise:

<template>
  <object class="GtkPopover">
    <child>
      <object class="GtkScrolledWindow">
        <property name="visible">True</property>
        <property name="max-content-width">300</property>
        <property name="max-content-height">300</property>
      </object>
    </child>
  </object>
</template>

Alternatively, you can call gtk_scrolled_window_set_max_content_width() and gtk_scrolled_window_set_max_content_height() if you want to achieve the same thing programmatically.